Multiply-connected ports
Sax supports multiply-connected ports, but be aware that those introduce gain.
Imports
MZI with multi-link nets
SAX supports multiply-connected ports: a single port connected to two or more
other ports via nets. The KLU backend handles this natively in its sparse matrix
formulation.

In this example input,out0 connects to both top,in0 and btm,in0, and both
top,out0 and btm,out0 connect to output,in0. We express this with nets --
a list of point-to-point connections where the same port may appear more than once:
netlist = {
    "instances": {
        "input": "waveguide",
        "top": "waveguide",
        "btm": "waveguide",
        "output": "waveguide",
    },
    "nets": [
        {"p1": "input,out0", "p2": "top,in0"},
        {"p1": "input,out0", "p2": "btm,in0"},  # multi-link: same source port
        {"p1": "top,out0", "p2": "output,in0"},
        {"p1": "btm,out0", "p2": "output,in0"},  # multi-link: same target port
    ],
    "ports": {
        "in0": "input,in0",
        "out0": "output,out0",
    },
}
Multi-link nets require the klu backend:
{('in0', 'in0'): Array(0.+0.j, dtype=complex128),
 ('in0', 'out0'): Array(-0.50130506+1.93615424j, dtype=complex128),
 ('out0', 'in0'): Array(-0.50130506+1.93615424j, dtype=complex128),
 ('out0', 'out0'): Array(0.+0.j, dtype=complex128)}
Wavelength sweep
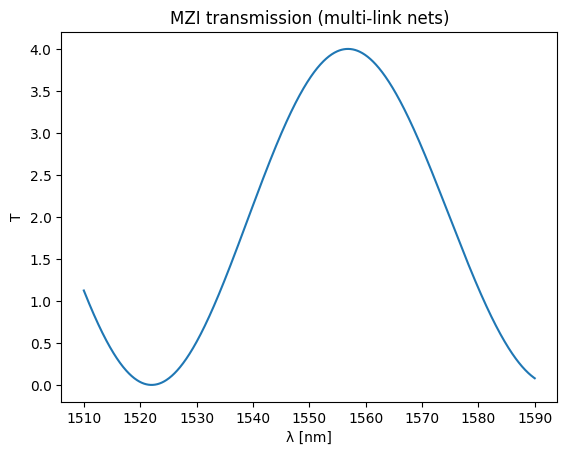
With different arm lengths we get interference fringes, similar to a classic MZI:
wl = jnp.linspace(1.51, 1.59, 1000)

S = mzi(wl=wl, top={"length": 25.0}, btm={"length": 15.0})

plt.plot(wl * 1e3, jnp.abs(S["in0", "out0"]) ** 2)
plt.xlabel("λ [nm]")
plt.ylabel("T")
plt.title("MZI transmission (multi-link nets)")
plt.show()
Why?
Multiply-connected ports are not recommended for general circuit design -- they introduce unphysical gain because the same signal is duplicated into every connected branch without attenuation.
So why support them at all? In practice, extracted netlists (e.g. from GDSFactory) sometimes contain layout errors where components overlap and ports end up shorted together. Rather than silently failing or forcing you to manually fix the netlist, SAX lets you simulate it anyway so you can evaluate whether the error matters for your results.
The MZI above is a deliberate misuse of the feature. A more realistic scenario is a stray connection to a branch that doesn't reach any output port you care about. For example, consider a straight waveguide where a layout error connects an extra dangling stub to the output:

The stub's far end isn't connected to any circuit port, so it doesn't carry signal to an output. In this case the multi-link is harmless -- it just means there is an extra branch that loads the node slightly. SAX won't block the simulation, letting you decide whether it's safe to ignore:
dangling_netlist = {
    "instances": {
        "wg": "waveguide",
        "wg2": "waveguide",
        "stub": "waveguide",
    },
    "nets": [
        {"p1": "wg,out0", "p2": "wg2,in0"},
        {"p1": "wg,out0", "p2": "stub,in0"},  # stray connection from layout error
    ],
    "ports": {
        "in0": "wg,in0",
        "out0": "wg2,out0",
    },
}

dangling_circuit, _ = sax.circuit(
    dangling_netlist,
    models={"waveguide": sax.models.straight},
    backend="klu",
)

sax.sdict(dangling_circuit())
{('in0', 'in0'): Array(0.+0.j, dtype=complex128),
 ('in0', 'out0'): Array(0.34730525+0.93775213j, dtype=complex128),
 ('out0', 'in0'): Array(0.34730525+0.93775213j, dtype=complex128),
 ('out0', 'out0'): Array(0.+0.j, dtype=complex128)}